Web Programming, Linux System Administation, and Entrepreneurship in Athens Georgia

Category: General (Page 3 of 25)

Should I Migrate From AWS Aurora back to MySQL?

5+ years ago one of my companies launched a product that is effectively a search engine monitoring tool. Is saves a lot of information about search engine results and the destination pages, then allows the users to see for which search phrases each pages ranks.

The workload is heavily write intensive. No matter the number of users we have to perform a bunch of data collection and save that into our database. A large increase in the number of users would increase the amount of reads, but the base workload of collecting all of the results remains the dominant workload for the database server.

We built this originally using MySQL 5.6, which we had used and managed extensively. We began having concerns with write capacity about the time the that AWS was starting to push Aurora as an alternative to MySQL, with cost and performance benefits. It seemed like an easy win, so we clicked the couple buttons and within minutes our database server was converted from MySQL to Aurora.

Things worked well for a long time. The product worked well and customers liked it. We tweaked the application here and there, but most of the base functionality just continued to do its thing. We moved on to developing other products and maintaining this one.

Fast forward a few years and we found that minor complaints had started to pile up. We add some indexes, make some code and queries more efficient. Adding indexes or altering a 500Gb table has some challenges, but there are tools like pt-online-schema-change that make table changes a little easier without downtime.

As time went on, we got better about allocating costs to the each product that we run and I did start to notice that the cost to run the Aurora instance was quite high. The instance cost itself was predictable, but the pricing of Aurora Database Storage includes a seemingly small cost of $0.20 per million I/O requests that was adding up to sometimes $200+ per day! It was at this point that I started to call Aurora a “Pay for Performance” product. Because it had the ability to scale I/O capacity quite high, inefficient queries executed fast enough not to notice. You just get charged more for them! It can be difficult to track down inefficient queries when everything is running fast. Performance Insights was very helpful to track down queries that could be optimized. By adding some indexes, we reduced our Database I/O and got our I/O costs down to under $100/day. On a traditional MySQL instance, with more limited I/O Capacity, these queries would have been more obvious, as they would have executed more slowly and our traditional troubleshooting would have brought them to our attention for the same optimizations. The “pay for performance” aspect of Aurora kept us from fixing the inefficient queries because they were hidden by being charged more.

Comparing Aurora Billed IO’s to MySQL IOPS

In November 2022 AWS announced that GP3 volumes are now available for RDS instances. The public documentation mentions a 3,000 IPS base capacity but doesn’t mention that for 400G+ volumes, that AWS actually spreads your storage over four volumes for theoretical base 12,000 IOPS. For an additional $0.02/IOPS you can increase your capacity up to 64,000 IOPS. So on the high end, the extra 52,000 extra IOPS at $0.02 comes to $1,040/month or about $35/day. There may be additional throughput needed as well, but for our workload, I found that IOPS was the bottleneck more than throughput.

Since we were still paying $60-$100 most days for Aurora Storage IOPS, it makes sense cost-wise to switch back from Aurora to MySQL. I also favor MySQL because it’s what we’re already used to. I’ve always thought that the monitoring and metrics available on Aurora instances wasn’t up to par with the MySQL instances. And there is just enough of a “black box” in Aurora that it makes things difficult.

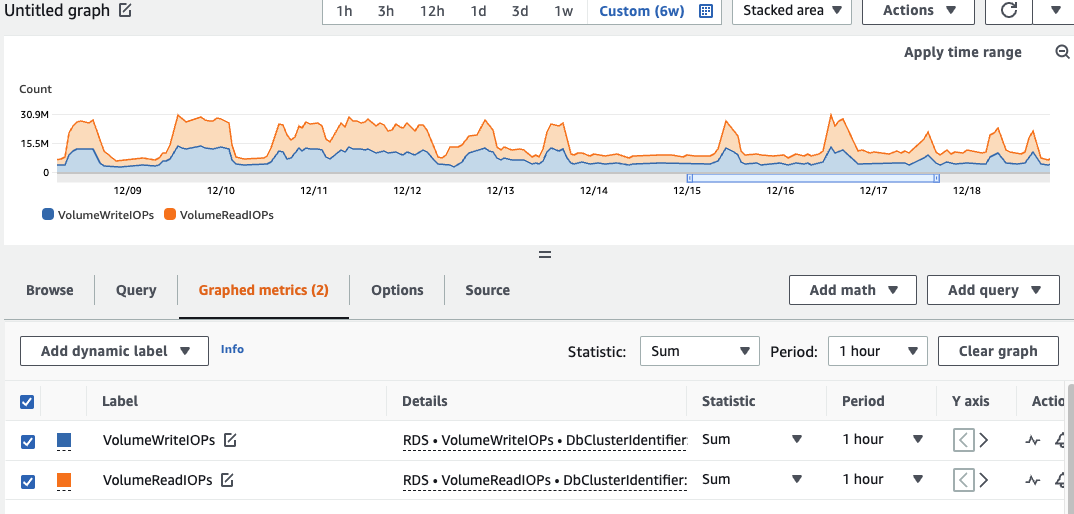
In trying to estimate how much IOPS we needed if we switch back to MySQL, I found it a bit of work to estimate how much Aurora was using in terms that I’m used to seeing for MySQL. The only IO metrics available are “[Billed] Volume Read IOPS” and “[Billed] Volume Write IOPS”. These are under the “Cluster” in Cloudwatch Metrics and look like they are billed at 1-hour granularities. Make sure to use the “Sum” statistic instead of “Average” or else you will be off a lot! My server had values values of around 4,000,000 to 13,000,000 for reads and 5,000,000 to 15,000,000 for writes. These values lined up pretty well to costs per day that I was able to see in Cost Explorer. When Cloudwatch Metrics showed a combined 500M IO’s for a day, I was charged $100. To convert the “Billed IOs” that Aurora reports, you have to divide by the number of seconds in the period. If looking at one-hour period, the 9,000,000 IO’s averages out to 2,500 IOPS (divide by 3600 seconds). 30,000,000 IO’s in an hour equates to an average of 8,333 IOPS.

AWS Aurora Billed Read and Write volume

Note that these are averages over an entire hour, so peaks within that hour could be dramatically higher! This gave me confidence that the 12,000 baseline IOPS and availability to pay for up to 64,000 IOPS with GP3 volumes should be able to perform the same workload that was being handled by Aurora.

The effect of Double-Writes
Also, announced in the past month was support for RDS Optimized Writes on newly launched instances within certain instance types. Its unclear if Aurora already has this type of feature enabled, so I’m not certain if the Billed Aurora IO Writes mentioned above would be the number calculated from there, or potentially half of that. Please let me know in comments below if you know, and I’ll update here once I’ve experimented and been able to tell.

How we saved over $700/month by switching from Carta to Google Drive

Carta is the Gold Standard for startups to keep their CAP Table, but at a price.

One of my companies hasn’t really raised any money, but we have a 50+ stakeholders do to a merger and employee options. We execute maybe 2-3 documents per year related to capital. So the $8,400 annual price of Carta cost us about $4,000 per transaction that we did. Obviously, that is absurd.

We ended up downloading all of the reports and PDFs of all existing options. And added some instructions for what we need to do when new options are granted, exercised, etc. We save the CAP table and related documents in a Google Drive (that we already pay for), and ended up saving $8,400+ per year!

I understand that there are a few other things, such as 409A valuations and peace of mind that come with having a professional software like Carta manage your CAP table, but the savings, for us, are an easy trade-off.

Silly Security: Don’t Show Me The Secret, Then Confirm I Have It!

I just received a replacement credit card from Health Equity because my previous card is expiring. Their validation screens made me laugh.

The first screen shows the card you are replacing, and includes the last four digits of the card.

 
Then the following screen asks for the last four digits of the card number “In order to verify possession”.

You probably shouldn’t tell me the last four digits before asking me to confirm that I have the card.

Make Sure You Are Calculating Net Promoter Score Correctly

The Net Promoter Score can be a pretty valuable metric for determining customer happiness, and, more importantly, how likely your customers are to tell other people about your product.

The basic idea is that you ask customers how likely they are to recommend your product to someone. Those who respond as a 9 or 10 are considered “Promoters”. When asked about your product, they’ll respond positively and encourage others to use your product as well. Customers who answer with a 7 or 8 are satisfied, but not likely to talk positively about your product. Customers who answer with a six or below are considered “detractors”. When asked about your product, they’ll respond negatively, detracting from your reputation. If you have a higher number of “promoters” than “detractors”, then your NPS Score will be positive. More detractors than promoters will result in a negative NPS score.

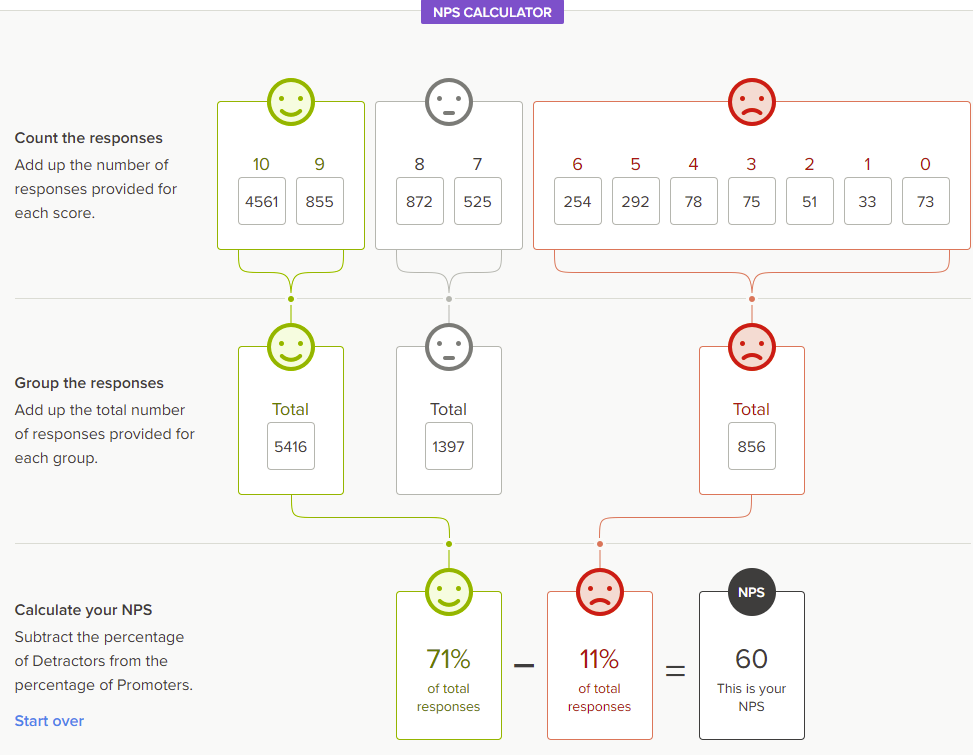
There is an excellent tool for calculating your Net Promoter Score at Delighted.com that helps to visualize this.

I was recently meeting with a leadership team and they mentioned that their Net Promoter Score was 6.6. That’s not a great score, but its not terrible. I don’t usually hear it expressed as a decimal, but I didn’t think much of it. After meeting with the team after several months, they kept mentioning NPS Score with a decimal and it had increased to 6.7. It was then that I began to ask questions into how they were calculating that. It turns out it was a simple average on a rating from 1 to 10. That is NOT an NPS Score! If anybody ever tells you their Net Promoter Score is between 1 and 10, make sure to dig in and make sure they are calculating it correctly! Scores should range from -100 (All detractors) to +100 (All promoters).

When calculated correctly, this product’s NPS score was actually negative. That helps to explain why revenue growth has been a challenge and marketing dollars are not moving the needle as they’d like.

Contrast that with another organization I meet with regularly. They calculate their NPS Score correctly and it’s a 60! No wonder this company has incredible growth and is doing well.

While your NPS score is negative, your first priority should be fixing the product and customer experience. Otherwise, every customer that signs up is likely going to detract from others using your product.

How to Think About Annual Contracts, Up-front Payments

I’ve helped several teams lately go through an analysis of when to consider annual prepayments for services. These are some of the decision criteria and metrics that I use to consider if an annual contract or pre-payment should be considered.

As a baseline, calculate the full amount that you would pay monthly. For most software products, this is the regularly advertised price. Make sure you are looking at the actual monthly plan proce though. A lot of services have started advertising as “$x per month billed annually“. Make sure to select the monthly payment price whe you see that. Some services, like commercial insurance charge a small per-payment fee for “installment plans” that should be included.

Next, calculate the full price if paid up-front. Of course, you need to include discounts that are offered. Sometimes, an offer may make it a period other than one year, such as “buy now and get 13 months for the price of 12”, which makes it a little more complex. In that case, you could consider the annual price as 12/13 of the amount you pay. Or, if the extra month is not really material, you may chose to ignore the extea month.

After you’ve got those two numbers (the annual and monthly prices), you should consider the other terms and internal needs.

Consider if your usage of the service is expected to change much over the next 12 months.

Also, consider how much flexibilty you lose with an annual pre-payment. Some services, like Slack give you a credit if usage decreases. Others have no flexibility and you pay that amount, even if usage decreases or you cancel.

In general, I expect around a 15% discount for a full up-front payment and very flexible terms for changes in usage or cancellation. If terms are more strict, I’d aim for more like a 30% (or more) discount for the commitment and up-front payment.

Finally, consider your own cash flow and capital positions. If you have an plenty of cash in the bank, you can lean toward the saving of an annual prepayment. If you don’t have a lot of cash, You’ll favor the monthly terms.

What are your thoughts and experience? What else should be considered when evaluation annual payments?

Using LastPass to Save Passwords and Log In to Multiple AWS Accounts With Two-Factor Authentication

I have multiple businesses, so I log into AWS multiple times per day.

That is a little tricky to do using LastPass since AWS has some hidden form fields that must be filled in
when using two-factor authentication through Google Authenticator.

In order to make it work correctly, I’ve had to modify the extra details in LastPass to add some extra hidden fields. If you set these up in your LastPass credentials for AWS, you should be able to log in with just a couple clicks, like usual, instead of having to type in some of those fields every time or having them overwritten.

Also, make sure to check the “Disable Autofill” checkbox an all of your AWS LastPass entries. Otherwise, one of them will overwrite the hidden form fields on the Two-Factor authentication page

Google Docs and Sheets should Almost Always be Restricted to Defined Users

Somebody sends you a link to a Google Sheet and it just works. It’s magical.
But that magic comes at a cost. I see far, far too many organizations that regularly share Google Documents and Sheets by using the share with “Anyone with the link” option that Google easily provides.

That is almost ALWAYS a bad idea. The convenience of having it shared with anybody is, at the same time, a potential security problem today and in the future.

But that long link with the 44 random-looking characters would be impossible for somebody to guess, right?

Yes. It would be statistically improbable for somebody to just guess a random string of 44 characters that would result in an actual document. It is possible that an attacker could write programs that could guess millions and millions of links to try them until they found some documents that actually exist. But that’s not the most likely weakness.

Consider what happens when you email a for your spreadsheet to somebody else. You have zero control over who accesses it after that. What if the recipient forwards your email with the link to somebody else? Often emails to businesses are forwarded into Customer Relationship Management (CRM) or similar systems where that link is now accessible to many other people in the organization. What if an attacker has access to a recipients email? Or a CRM system? How about if an employee leaves the company and they still have it in a browser history.

In all of those scenarios, and hundreds more that you can’t imagine, if your document is shared with “Anyone with the link”, literally anybody that sees that link can open it and you have absolutely no knowledge that they did.

Always share only with specific email addresses.

Sharing with Google Groups

Sharing with specific people can become a headache to maintain as people change roles. Consider using the Google Groups feature in your organization. You can set up a Google Group for something like ‘[email protected]’ or ‘[email protected]’ and ask to have documents shared with that group instead of individual people. You can then add and remove people from the groups to provide access to only those that are allowed.

See More information about sharing with Groups at https://support.google.com/a/users/answer/9308872?hl=en

Find MySQL indexes that can be removed to free up disk space and improve performance

I wrote this handy query to find indexes that can be deleted because they have not been in use. It
queries the performance_schema database for usage on the indexes, and joins on INFORMATION_SCHEMA.TABLES
to see the index size.

Indexes that have zero reads and writes are obvious candidates for removal. They take extra write overhead to keep them
updated, and you can improve performance on a busy server by removing them. You can also free up some disk space
without them. The size column below helps to understand where you have the most opportunity for saving on disk
usage.

mysql>
SELECT. OBJECT_NAME,
        index_name,
        SUM(INDEX_LENGTH) AS size,
        SUM(count_star) AS count_star,
        SUM(count_read) AS count_read,
        SUM(count_write) AS count_write
FROM  table_io_waits_summary_by_index_usage
JOIN information_schema.TABLES
    ON table_io_waits_summary_by_index_usage.OBJECT_SCHEMA = TABLES.TABLE_SCHEMA
   AND table_io_waits_summary_by_index_usage.OBJECT_NAME = TABLES.TABLE_NAME
WHERE OBJECT_SCHEMA LIKE 'mydatabase%'
GROUP BY object_name, index_name
ORDER BY count_star ASC, size DESC
LIMIT 20;

+------------------------------+---------------------------------+-------------+------------+------------+-------------+
| OBJECT_NAME                  | index_name                      | size        | count_star | count_read | count_write |
+------------------------------+---------------------------------+-------------+------------+------------+-------------+
| transactions                 | order_id                        | 42406641664 |          0 |          0 |           0 |
| transactions                 | msku-timestamp                  | 42406641664 |          0 |          0 |           0 |
| transactions                 | fkTransactionsBaseEvent         | 42406641664 |          0 |          0 |           0 |
| baseEvent                    | PRIMARY                         | 33601945600 |          0 |          0 |           0 |
| baseEvent                    | eventTypeId                     | 33601945600 |          0 |          0 |           0 |
| orders                       | modified                        | 20579876864 |          0 |          0 |           0 |
| orders                       | buyerId-timestamp               | 20579876864 |          0 |          0 |           0 |
| productReports               | productAd-date-venue            |  8135458816 |          0 |          0 |           0 |
| shipmentEvent                | id                              |  7831928832 |          0 |          0 |           0 |
| shipmentEvent                | eventTypeId                     |  7831928832 |          0 |          0 |           0 |
| historyEvents                | timestamp_venue_entity          |  4567531520 |          0 |          0 |           0 |
| targetReports                | venueId-date-targetId           |  3069771776 |          0 |          0 |           0 |
| productAds                   | venue-productAd                 |  1530888192 |          0 |          0 |           0 |
| keywords                     | venue-keyword                   |   895598592 |          0 |          0 |           0 |
| targetingExpressions         | venue-target                    |   215269376 |          0 |          0 |           0 |
| targetingExpressions         | rType-rValue                    |   215269376 |          0 |          0 |           0 |
| serviceFeeEvent              | PRIMARY                         |    48234496 |          0 |          0 |           0 |
| serviceFeeEvent              | id                              |    48234496 |          0 |          0 |           0 |
| serviceFeeEvent              | eventTypeId                     |    48234496 |          0 |          0 |           0 |
| adGroups                     | venue-adGroup                   |    42336256 |          0 |          0 |           0 |

MySQL Encryption In-Transit Does NOT Require Client-Side Certificates

There are many articles around the Internet that discuss enabling Encryption in-transit to MySQL servers. They all include instructions about creating Client Certificates, but they don’t clearly explain that Client-Side Certificates are not a requirement to achieve end-to-end encryption between client and server.

Creating Client certificates that can be authenticated by the server can be complicated. It is not even possible in some scenarios, such as using servers hosted by AWS RDS, since AWS runs its own Certificate Authority. But don’t let that stop you. Below, I will demonstrate that enabling SSL/TLS on the server, and using a client that supports encryption is sufficient to securely encrypt traffic between the two.

First, I set up a MySQL server on RDS using MySQL version 8.0.25. Nothing special here, except that I’m going to make it “Publicly Accessible” which gives is a Public IP Address so that I can access it over the Internet. My Security Group here already allows inbound port 3307 from my desired IP Addresses for testing:

aws rds create-db-instance \
    --db-instance-identifier=encryption-tester \
    --allocated-storage=20 \
    --db-instance-class=db.t3.micro \
    --engine=mysql \
    --master-username=admin \
    --master-user-password="thepasswordIchose" \
    --vpc-security-group-ids="sg-0bf6fa7080100e55b" \
    --backup-retention-period=0 \
    --port=3307 \
    --no-multi-az \
    --engine-version=8.0.25 \
    --publicly-accessible

It takes several minutes for my Database Instance to be created, then I can log into it with the command:

mysql -h encryption-tester.accountidstuff.us-east-1.rds.amazonaws.com -u admin --port=3307 -p

I run the command show status like 'ssl_cipher'; and look at that! My connection is encrypted already, as indicated by Cipher method present:

$ mysql -h encryption-tester.accountidstuff.us-east-1.rds.amazonaws.com -u admin --port=3307 -p
Enter password:
Welcome to the MySQL monitor.  Commands end with ; or \g.
Your MySQL connection id is 17
Server version: 8.0.25 Source distribution

Copyright (c) 2000, 2021, Oracle and/or its affiliates.

Oracle is a registered trademark of Oracle Corporation and/or its
affiliates. Other names may be trademarks of their respective
owners.

Type 'help;' or '\h' for help. Type '\c' to clear the current input statement.

mysql> show status like 'ssl_cipher';
+---------------+-----------------------------+
| Variable_name | Value                       |
+---------------+-----------------------------+
| Ssl_cipher    | ECDHE-RSA-AES128-GCM-SHA256 |
+---------------+-----------------------------+
1 row in set (0.01 sec)

I haven’t set up any client certificates or anything special, yet my connection is encrypted. But let’s not take the session variable’s word for it. Lets double-check by capturing and inspecting some packets.

I’ll run tcpdump with this command:

sudo tcpdump -i any host encryption-tester.accountidstuff.us-east-1.rds.amazonaws.com  -s 65535 -w /tmp/initial-connection.pcap

To make it quick, Instead of using a full packet-analysis program, I just run the strings command to look for text strings in the packet capture:

17:05 $ strings -8  /tmp/initial-connection.pcap
=JpgP~eS
mysql_native_password
Washington1
Seattle1"0
Amazon Web Services, Inc.1
Amazon RDS1%0#
Amazon RDS us-east-1 2019 CA0
210824170035Z
240822170850Z0
:encryption-tester.accountidstuff.us-east-1.rds.amazonaws.com1
Amazon.com1
Seattle1
Washington1
Seattle1
Washington1"0
Amazon Web Services, Inc.1
Amazon RDS1 0
Amazon RDS Root 2019 CA
:encryption-tester.accountidstuff.us-east-1.rds.amazonaws.com0
Seattle1
Washington1"0
Amazon Web Services, Inc.1
Amazon RDS1 0
Amazon RDS Root 2019 CA0
190919181653Z
240822170850Z0
Washington1
Seattle1"0
Amazon Web Services, Inc.1
Amazon RDS1%0#
Amazon RDS us-east-1 2019 CA0
HId0%aC>

Looks like a lot of stuff in that output about the certificate and SSL negotiation, but nothing containing the queries I executed.

I’m going to try it again and specifically disable encryption to see what the packets look like and ensure they contain the plain-text statements and responses I expect:

This is my SQL session:

17:05 $ mysql --ssl-mode=DISABLED -h encryption-tester.accountidstuff.us-east-1.rds.amazonaws.com -u admin --port=3307 -p
Enter password:
Welcome to the MySQL monitor.  Commands end with ; or \g.
Your MySQL connection id is 32
Server version: 8.0.25 Source distribution

Copyright (c) 2000, 2021, Oracle and/or its affiliates.

Oracle is a registered trademark of Oracle Corporation and/or its
affiliates. Other names may be trademarks of their respective
owners.

Type 'help;' or '\h' for help. Type '\c' to clear the current input statement.

mysql> select version();
+-----------+
| version() |
+-----------+
| 8.0.25    |
+-----------+
1 row in set (0.00 sec)

mysql> show status like 'ssl_cipher';
+---------------+-------+
| Variable_name | Value |
+---------------+-------+
| Ssl_cipher    |       |
+---------------+-------+
1 row in set (0.01 sec)

mysql> \q

The strings in the packets captured during that session clearly contain things relevant to the commands that I executed:

17:05 $ strings -5 /tmp/skip-ssl.pcap
1%aCu
1%a\u
8.0.25
*Bi|tm
UkU-dsK
mysql_native_password
admin
mysql_native_password
Linux
_client_name
libmysql
24817
_client_version
5.7.35  _platform
x86_64
program_name
mysql
select @@version_comment limit 1
@@version_comment
Source distribution
select version()
        version()
8.0.25
show status like 'ssl_cipher'
performance_schema
session_status
session_status
Variable_name
Variable_name
performance_schema
session_status
session_status
Value
Value
Ssl_cipher

Conclusion:

SSL Client-Certificates are NOT required for traffic to be encrypted to a MySQL server. In fact, with a modern client and server, SSL is preferred and is automatically enabled. Just like I’d expect for traffic to be encrypted by default in 2021.

So what is the purpose of Client Certificates during a MySQL Connection

Client Certificates are intended to verify the identity of the Client. They are an extra step of authentication beyond a typical username and password. By presenting a client certificate that has been properly signed by a recognized Certificate Authority, the client is proving that their identity or system has been verified by the Certificate Authority.

Because SSL is complicated and is not well understood, many well-meaning people have instructions for creating a client key and client certificate, and transmitting those to authorized users. While that does provide a second piece of information needed to authenticate to the server, it is not how a secure client should authenticate.

The proper, fully secure method for a client to get a certificate is for the client to create its own private key. It should never share that key, even with the Certificate Authority. With the private key created, it would then create a certificate signing request (CSR), and present only the certificate signing request to the Certificate Authority. The certificate authority takes whatever steps it requires to verify the authenticity of the client, then provide the client back with a Client Certificate signed by the Certificate Authority. That Client Certificate is the client’s evidence that it’s identity has been verified by the Certificate Authority. The Certificate Authority is able to provide the client certificate without ever having the client’s private key.

Best Practices

If you run a MySQL Server and want to require that all clients to connect via SSL/TLS, you can set the global setting require_secure_transport to true. To require SSL only for specific users, use the CREATE USER ... REQUIRE SSL statement when creating the MySQL user

Installing Composer Packages with custom SSH Identities

Several posts around the Internet describe how to use a specific SSH Identity composer packages, but I can never find them when needed.

This is how I use a specific SSH identity file for packages deployed with GitHub via Deploy keys. GitHub allows a deploy key to be used with only a single repository, so if you have multiple repositories, you need a separate SSH key for each.

Create the SSH Key

ssh-keygen -t ed25519 -f ~/.ssh/repo-foobar -N '' -C "foobar-deploy"

Copy the contents of ~/.ssh/repo-foobar.pub into the “Deploy Key” section of the Repository settings in GitHub.

Now, you can script a deploy, including a composer install that includes that repository with the command

Use a custom GIT_SSH_COMMAND during composer install

cd /path/to/codebase
export GIT_SSH_COMMAND="ssh -i /home/username/.ssh/repo-foobar -o 'IdentitiesOnly yes '"
COMPOSER_HOME="/home/username/" composer install

The composer_install command uses the defined SSH command (instead of just plain ssh). In doing so, it uses the identity only from the specified key.

Have multiple repos included in your composer.json file that each need a separate identity?

You’ll need to create the SSH key and upload a separate key to GitHub for each repo. However, you can only specify one SSH key to use during the composer install. While there are more elegant solutions, I’ve found the simplest is just to run composer install multiple times, one for each package, and change the identity file between each one. The first execution will fail, but will keep the downloaded code in the composer cache. The second one won’t need to re-download the first again since it is already in the cache, and if you with as many packages as you have, it will eventually succeed, having downloaded each of them.

« Older posts Newer posts »

© 2025 Brandon Checketts

Theme by Anders NorenUp ↑