Web Programming, Linux System Administation, and Entrepreneurship in Athens Georgia

Category: MySQL (Page 1 of 3)

MySQL 8.0.34 Upgrade and tons of MY-013360 ‘mysql_native_password’ is deprecated warnings

After upgrading a busy server to MySQL 8.0.34 I noticed that my error logs was filling up with tons of these errors. Hundreds of them a second is causing some noticeable cost when they are going to CloudWatch Logs. It looks like the deprecation notice started in MySQL 8.0.34.

2023-08-18T22:01:12.183036Z 19100582 [Warning] [MY-013360] [Server] Plugin mysql_native_password reported: ''mysql_native_password' is deprecated and will be removed in a future release. Please use caching_sha2_password instead'

I could see that all of my active users were using the mysql_native_password plugin with this query:

mysql> select user, host, plugin from mysql.user;
+------------------+-------------+-----------------------+
| user             | host        | plugin                |
+------------------+-------------+-----------------------+
| user1            | %           | mysql_native_password |
| user2            | %           | mysql_native_password |
| user3            | %           | mysql_native_password |
| mysql.infoschema | localhost   | caching_sha2_password |
| mysql.session    | localhost   | caching_sha2_password |
| mysql.sys        | localhost   | caching_sha2_password |
| rdsadmin         | localhost   | mysql_native_password |
+------------------+-------------+-----------------------+
7 rows in set (0.01 sec)

Some googling pointed me to this Stack Overflow article which was somewhat related, and where I figured out how to change the authentication plugin for each user with the command:

ALTER USER user2@'%' IDENTIFIED WITH caching_sha2_password BY 'the_password';

After updating each account, they look correct in the mysql user table:

mysql> select user, host, plugin from mysql.user;
+------------------+-------------+-----------------------+
| user             | host        | plugin                |
+------------------+-------------+-----------------------+
| user1            | %           | caching_sha2_password |
| user2            | %           | caching_sha2_password |
| user3            | %           | caching_sha2_password |
| mysql.infoschema | localhost   | caching_sha2_password |
| mysql.session    | localhost   | caching_sha2_password |
| mysql.sys        | localhost   | caching_sha2_password |
| rdsadmin         | localhost   | mysql_native_password |
+------------------+-------------+-----------------------+
7 rows in set (0.00 sec)

But the error continued at the same volume, so even though the Database user accounts seem to be configured correctly, the MySQL client library that I’m using must still be falling back to mysql_native_password. This application is using PHP 7.4.3, so it’s not too old, and some references indicate that support for caching_sha2_password was released in PHP 7.2, so that shouldn’t be the problem.

I see that the default_authentication_plugin variable is set to mysql_native_password, but this database instance is hosted on RDS, and that configuration value is not modifiable.

I see that the MySQL log_error_suppression_list is also available and could be configured to suppress only the MY-013360 error. Unfortunately, this value is not configurable using MySQL8 Parameter groups.

In the mean time, I’m spending several dollars per day in Cloudwatch logs for this, so to turn it off, I was able to disable deprecation notices from being logged by setting the global log_error_verbosity value to 1 (instead of the default of 2).

This prevented the error from filling up the logs for now. Next I can try upgrading the application to PHP 8 and checking into specific connection parameters that may force it to use caching_sha2_password.

Do you have more or updated information? Or just questions? Please let everybody know in the comments below. FWIW, I’ve created an AWS Re:Post topic requesting the addition of log_error_suppression_list in a parameter group. Feel free to vote that up if you run into this issue.

Migrating 1.2 TB Database From Aurora to MySQL

We have one database server that is running on an old version of Aurora based on MySQL 5.6. AWS is deprecating that version soon and it needs to be upgraded, so I have been working on replacing it. Upgrading the existing 5.6 server to 5.7, then to 8.0 isn’t an option due to an impossibly huge InnoDB transaction history list that will never fix itself. Plus, I want to improve a couple of other things along the way.

I made several attempts and migrating from Aurora 5.6 to Aurora 8.0, but during that process, I grew tired of Aurora quirks and costs. Here are some of my raw notes on what was an embarrassingly long migration of a database server from Aurora to MySQL. Going from MySQL to Aurora took just a couple of clicks. But converting from Aurora back to MySQL took months and a lot of headaches.

TLDR: Along the way, I tried Using Amazon’s Database Migration Service, but eventually gave up for a good old closely monitored mysqldump and custom scripts.

I had a few goals/requirements:

  • Get rid of or soon-to-be-deprecated Aurora instance based on MySQL 5.6
  • Stop Paying for Storage IOPS (often over $100/day)
  • Convert tables from utf8mb3 to utf8mb4
  • Minimal downtime or customer disruption. Some disruption during low-usage times is okay.

A new MySQL 8 instance with a GP3 storage volume and the recently announced RDS Optimized Writes means that MySQL should be able to handle the workload with no problem, and gets this server back into the MySQL realm, where all of our other servers are, and with which we are more comfortable.

Attempts at using AWS Database Migration Service (DMS)

This service looked promising, but has a learning curve. I eventually gave up using it because of repeated problems that would have taken too much effort to try and resolve.

First attempts:
On the surface, it seems like you configure a source, configure a destination, and then tell DMS to sync one to the other and keep them in sync. It does this in two Phases: the Full Dump, and the Change Data Capture (CDC). I learned the hard way that the Full Dump doesn’t include any indexes on the tables! This is done to make it as fast as possible. The second, CDC Phase, just executes statements from the binary log, so without indexes on a 400+G table, they take forever and this will never work.

I also concluded that one of our 300+GB tables can actually be done in a separate process, after the rest of the data is loaded. It contains historic information that will make some things in the application look incomplete until it is loaded, but the application will work with it empty.

Second attempts:
Used DMS for the full dump, the configured it to stop after the full dump, before starting the CDC Process. While it is stopped, I added the database indexes and foreign keys. I tried this several times with varying degrees of success and trying to minimize the amount of time that it took to add the indexes. Some tables were done instantly, some took a couple hours, and some were 12+ hours. At one point I had figured it would take about 62 hours to add the indexes. I think I got that down to 39 hours by increasing the IOPS, running some ALTER TABLES in parallel, etc.

After indexes were added, I started the second phase of DMS – the Change Data Capture is supposed to pick up in time where the Full Dump was taken, and then apply all of the changes from the Binary Logs to the new server. That process didn’t go smoothly. Again, the first attempts looked promising, but then the binary logs on the server were deleted, so it couldn’t continue. I increased the number of days that binary logs were kept, and made more attempts, but they had problems with foreign key and unique constraints on tables.

The biggest problem with these attempts was that it took about 24 hours for the data migration, and about 48 hours to add indexes. So each attempt was several days effort.

Third and last attempts at using DMS:
After getting pretty familiar DMS, I ended up creating the schema via `mysqldump –no-data` then manually editing the file to exclude indexes on some of the biggest tables that would cause the import to go slow. I excluded the one large, historic table. My overall process looked like this:

  • code>mysqldump –defaults-group-suffix=dumpschema –no-data thedatabase |sed “s/utf8 /utf8mb4 /” | sed “s/utf8_/utf8mb4_/” > /tmp/schema-limited-indexes.sql
  • Edit /tmp/schema-limited-indexes.sql and remove foreign keys and indexes on large tables
  • cat /tmp/schema-limited-indexes.sql | mysql –defaults-group-suffix=newserver thedatabase
  • On the new server, run ALTER TABLE the_historic_table ENGINE=blackhole;
  • Start DMS process, make sure to have it stop between Full Load and CDC.
  • Wait ~24+ hours for Full load to complete
  • Add Indexes back that were removed from the schema. I had a list of ALTER TABLE statements to run, with an estimate time that each should take. That was estimated at 39 hours
  • Start second Phase (CDC) of the DMS Task
  • Wait for CDC to complete (time estimate unknown. The faster the above steps worked, the less it had to replay)

Unfortunately, a couple of attempts at this had the CDC phase still fail with Foreign key constraints. I tried several times and don’t know why this happened. Finding the offending rows took many hours since the queries didn’t have indexes and had to do full table scans. In some cases, there were just a few, to a few-dozen rows that existed in one table without the corresponding row in the foreign table. Its as if the binary log position taken when the snapshot was started was off by a few seconds and the dumps of different tables were started at slightly different positions.

After several attempts (taking a couple weeks), I finally gave up on the DMS approach.

Using MySQL Dump

Using mysqldump to move data from one database server to another is a process I have done thousands of times and written many scripts around. It is pretty well understood and predictable. I did a few trial runs to put together this process:

Temporarily Stop all processes on the master server

  • Stop all background processes that write to the server
  • Change the password so that no processes can write to the master
  • Execute SHOW BINARY LOGS on master and note the last binary log file and position. Do this a few times to make sure that it does not change. (Note that this would be easier if RDS allowed FLUSH TABLES WITH READ LOCK, but since it doesn’t, this process should work.

Dump the schema to the new server

This has the sed commands in the middle to convert the old “utf8” colations to the desired “utf8mb4” versions. When dumping 1TB+ of data, I found it helped performance a bit to do the schema changes with the sed commands first. That way the bulk of the data doesn’t have to go through these two commands.

  • mysqldump --defaults-group-suffix=dumpschema --no-data thedatabase |sed "s/utf8 /utf8mb4 /" | sed "s/utf8_/utf8mb4_/" | mysql thedatabase
  • .my.cnf contains this section with the relevant parameters for the dump
    [clientdumpschema]
    host=thehostname.cluster-czizrrfoedlm.us-east-1.rds.amazonaws.com
    port=3306
    user=dumper
    password=thepassword
    ssl-cipher=AES256-SHA:DHE-DSS-AES256-SHA:DHE-RSA-AES256-SHA
    quick
    compression-algorithms=zlib
    set-gtid-purged=OFF
    max_allowed_packet=1024M
    single-transaction=TRUE
    column_statistics=0
    net_buffer_length=256k
    

Move the data

To move the data, I ran this command. Note that it starts with time so that I could see how long it takes. Also, it includes

time mysqldump --defaults-group-suffix=dumpdata --no-create-info thedatabase | pv |mysql thedatabase

My .my.cnf contains this section for the import

host=thehostname.cluster-czizrrfoedlm.us-east-1.rds.amazonaws.com
port=3306
user=dumper
password=thepassword
ssl-cipher=AES256-SHA:DHE-DSS-AES256-SHA:DHE-RSA-AES256-SHA
quick
ignore-table=thedatabase.the_big_table
compression-algorithms=zlib
set-gtid-purged=OFF
max_allowed_packet=1024M
single-transaction=TRUE
column_statistics=0
net_buffer_length=256k

Note that the above command includes the linux pv in between which is a nice way to monitor the progress. It displays a simple line to stderr that allows you to see the total transfer size, elapsed time, and current speed.

266.5GiB 57:16:47 [ 100KiB/s] [             <=>         ]

I experimented with several values for the NET_BUFFER_LENGTH parameter by dumping the same multi-GB table over and over with different values for NET_BUFFER_LENGTH. The size of this value determines how many values are included in the INSERT INTO statement generated by mysqldump. I was hoping that a larger value would improve performance, but I found that larger values slowed down. I found the best value was to use 256k.

NET_BUFFER_LENGTH value Elapsed Time
64k 13m 44s
256k 8m 27s
256k 7m 20s
1M 10m 23s
16M 11m 32s

After Migration is Started

After the mysqldump has been started, I re-enabled traffic back to the master server by setting the password back to the original. I kept all background jobs disabled to minimize the amount of data that had to be copied over afterwards.

Final attempt to use DMS

After the mysqldump was finished, I attempted to use the DMS Change Data Capture process to copy over the data that had changed on the master. You can start a Database Migration Task that begins at a specific point in the Master Log position. Maybe. I tried, it, but it failed pretty quickly with a duplicate key constraint. I gave up on DMS and figured I would just move over any data needed manually via custom scripts.

Other findings

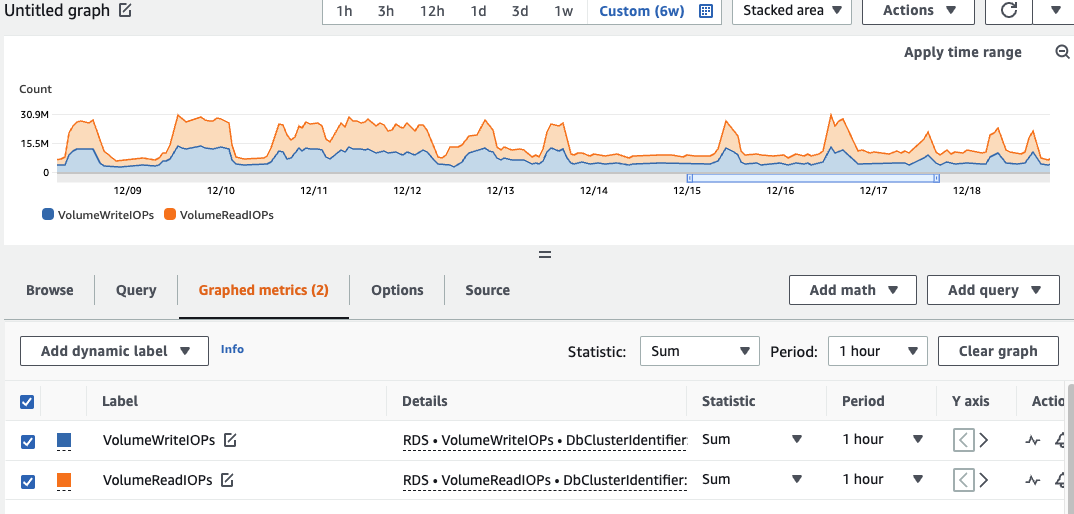
In attempting to maximimize the speed of the transfer, I attempted to increase the IOPS on the GP3 volume from its base level of 12,000 to 32,000. Initially that helped, but for some reason I still don’t understand, the throughput was then limited very strictly to 6,000 IOPS. As seen in the chart below, it bursted above that for some short parts, but it was pretty strictly constrained for most of the time. I think this has to do with how RDS uses multiple volumes to store the data. I suspect that each volume has 6,000 capacity, and all of my data was going to a single volume.

RDS IOPS

RDS IOPS Maxed at 6,000

That concludes the notes that I wanted to take. Hopefully somebody else finds these learnings or settings useful. If this has been helpful, or if you have any comments on some of the problems that I experienced, please let me know in the comments below.

Should I Migrate From AWS Aurora back to MySQL?

5+ years ago one of my companies launched a product that is effectively a search engine monitoring tool. Is saves a lot of information about search engine results and the destination pages, then allows the users to see for which search phrases each pages ranks.

The workload is heavily write intensive. No matter the number of users we have to perform a bunch of data collection and save that into our database. A large increase in the number of users would increase the amount of reads, but the base workload of collecting all of the results remains the dominant workload for the database server.

We built this originally using MySQL 5.6, which we had used and managed extensively. We began having concerns with write capacity about the time the that AWS was starting to push Aurora as an alternative to MySQL, with cost and performance benefits. It seemed like an easy win, so we clicked the couple buttons and within minutes our database server was converted from MySQL to Aurora.

Things worked well for a long time. The product worked well and customers liked it. We tweaked the application here and there, but most of the base functionality just continued to do its thing. We moved on to developing other products and maintaining this one.

Fast forward a few years and we found that minor complaints had started to pile up. We add some indexes, make some code and queries more efficient. Adding indexes or altering a 500Gb table has some challenges, but there are tools like pt-online-schema-change that make table changes a little easier without downtime.

As time went on, we got better about allocating costs to the each product that we run and I did start to notice that the cost to run the Aurora instance was quite high. The instance cost itself was predictable, but the pricing of Aurora Database Storage includes a seemingly small cost of $0.20 per million I/O requests that was adding up to sometimes $200+ per day! It was at this point that I started to call Aurora a “Pay for Performance” product. Because it had the ability to scale I/O capacity quite high, inefficient queries executed fast enough not to notice. You just get charged more for them! It can be difficult to track down inefficient queries when everything is running fast. Performance Insights was very helpful to track down queries that could be optimized. By adding some indexes, we reduced our Database I/O and got our I/O costs down to under $100/day. On a traditional MySQL instance, with more limited I/O Capacity, these queries would have been more obvious, as they would have executed more slowly and our traditional troubleshooting would have brought them to our attention for the same optimizations. The “pay for performance” aspect of Aurora kept us from fixing the inefficient queries because they were hidden by being charged more.

Comparing Aurora Billed IO’s to MySQL IOPS

In November 2022 AWS announced that GP3 volumes are now available for RDS instances. The public documentation mentions a 3,000 IPS base capacity but doesn’t mention that for 400G+ volumes, that AWS actually spreads your storage over four volumes for theoretical base 12,000 IOPS. For an additional $0.02/IOPS you can increase your capacity up to 64,000 IOPS. So on the high end, the extra 52,000 extra IOPS at $0.02 comes to $1,040/month or about $35/day. There may be additional throughput needed as well, but for our workload, I found that IOPS was the bottleneck more than throughput.

Since we were still paying $60-$100 most days for Aurora Storage IOPS, it makes sense cost-wise to switch back from Aurora to MySQL. I also favor MySQL because it’s what we’re already used to. I’ve always thought that the monitoring and metrics available on Aurora instances wasn’t up to par with the MySQL instances. And there is just enough of a “black box” in Aurora that it makes things difficult.

In trying to estimate how much IOPS we needed if we switch back to MySQL, I found it a bit of work to estimate how much Aurora was using in terms that I’m used to seeing for MySQL. The only IO metrics available are “[Billed] Volume Read IOPS” and “[Billed] Volume Write IOPS”. These are under the “Cluster” in Cloudwatch Metrics and look like they are billed at 1-hour granularities. Make sure to use the “Sum” statistic instead of “Average” or else you will be off a lot! My server had values values of around 4,000,000 to 13,000,000 for reads and 5,000,000 to 15,000,000 for writes. These values lined up pretty well to costs per day that I was able to see in Cost Explorer. When Cloudwatch Metrics showed a combined 500M IO’s for a day, I was charged $100. To convert the “Billed IOs” that Aurora reports, you have to divide by the number of seconds in the period. If looking at one-hour period, the 9,000,000 IO’s averages out to 2,500 IOPS (divide by 3600 seconds). 30,000,000 IO’s in an hour equates to an average of 8,333 IOPS.

AWS Aurora Billed Read and Write volume

Note that these are averages over an entire hour, so peaks within that hour could be dramatically higher! This gave me confidence that the 12,000 baseline IOPS and availability to pay for up to 64,000 IOPS with GP3 volumes should be able to perform the same workload that was being handled by Aurora.

The effect of Double-Writes
Also, announced in the past month was support for RDS Optimized Writes on newly launched instances within certain instance types. Its unclear if Aurora already has this type of feature enabled, so I’m not certain if the Billed Aurora IO Writes mentioned above would be the number calculated from there, or potentially half of that. Please let me know in comments below if you know, and I’ll update here once I’ve experimented and been able to tell.

Find MySQL indexes that can be removed to free up disk space and improve performance

I wrote this handy query to find indexes that can be deleted because they have not been in use. It
queries the performance_schema database for usage on the indexes, and joins on INFORMATION_SCHEMA.TABLES
to see the index size.

Indexes that have zero reads and writes are obvious candidates for removal. They take extra write overhead to keep them
updated, and you can improve performance on a busy server by removing them. You can also free up some disk space
without them. The size column below helps to understand where you have the most opportunity for saving on disk
usage.

mysql>
SELECT. OBJECT_NAME,
        index_name,
        SUM(INDEX_LENGTH) AS size,
        SUM(count_star) AS count_star,
        SUM(count_read) AS count_read,
        SUM(count_write) AS count_write
FROM  table_io_waits_summary_by_index_usage
JOIN information_schema.TABLES
    ON table_io_waits_summary_by_index_usage.OBJECT_SCHEMA = TABLES.TABLE_SCHEMA
   AND table_io_waits_summary_by_index_usage.OBJECT_NAME = TABLES.TABLE_NAME
WHERE OBJECT_SCHEMA LIKE 'mydatabase%'
GROUP BY object_name, index_name
ORDER BY count_star ASC, size DESC
LIMIT 20;

+------------------------------+---------------------------------+-------------+------------+------------+-------------+
| OBJECT_NAME                  | index_name                      | size        | count_star | count_read | count_write |
+------------------------------+---------------------------------+-------------+------------+------------+-------------+
| transactions                 | order_id                        | 42406641664 |          0 |          0 |           0 |
| transactions                 | msku-timestamp                  | 42406641664 |          0 |          0 |           0 |
| transactions                 | fkTransactionsBaseEvent         | 42406641664 |          0 |          0 |           0 |
| baseEvent                    | PRIMARY                         | 33601945600 |          0 |          0 |           0 |
| baseEvent                    | eventTypeId                     | 33601945600 |          0 |          0 |           0 |
| orders                       | modified                        | 20579876864 |          0 |          0 |           0 |
| orders                       | buyerId-timestamp               | 20579876864 |          0 |          0 |           0 |
| productReports               | productAd-date-venue            |  8135458816 |          0 |          0 |           0 |
| shipmentEvent                | id                              |  7831928832 |          0 |          0 |           0 |
| shipmentEvent                | eventTypeId                     |  7831928832 |          0 |          0 |           0 |
| historyEvents                | timestamp_venue_entity          |  4567531520 |          0 |          0 |           0 |
| targetReports                | venueId-date-targetId           |  3069771776 |          0 |          0 |           0 |
| productAds                   | venue-productAd                 |  1530888192 |          0 |          0 |           0 |
| keywords                     | venue-keyword                   |   895598592 |          0 |          0 |           0 |
| targetingExpressions         | venue-target                    |   215269376 |          0 |          0 |           0 |
| targetingExpressions         | rType-rValue                    |   215269376 |          0 |          0 |           0 |
| serviceFeeEvent              | PRIMARY                         |    48234496 |          0 |          0 |           0 |
| serviceFeeEvent              | id                              |    48234496 |          0 |          0 |           0 |
| serviceFeeEvent              | eventTypeId                     |    48234496 |          0 |          0 |           0 |
| adGroups                     | venue-adGroup                   |    42336256 |          0 |          0 |           0 |

MySQL Encryption In-Transit Does NOT Require Client-Side Certificates

There are many articles around the Internet that discuss enabling Encryption in-transit to MySQL servers. They all include instructions about creating Client Certificates, but they don’t clearly explain that Client-Side Certificates are not a requirement to achieve end-to-end encryption between client and server.

Creating Client certificates that can be authenticated by the server can be complicated. It is not even possible in some scenarios, such as using servers hosted by AWS RDS, since AWS runs its own Certificate Authority. But don’t let that stop you. Below, I will demonstrate that enabling SSL/TLS on the server, and using a client that supports encryption is sufficient to securely encrypt traffic between the two.

First, I set up a MySQL server on RDS using MySQL version 8.0.25. Nothing special here, except that I’m going to make it “Publicly Accessible” which gives is a Public IP Address so that I can access it over the Internet. My Security Group here already allows inbound port 3307 from my desired IP Addresses for testing:

aws rds create-db-instance \
    --db-instance-identifier=encryption-tester \
    --allocated-storage=20 \
    --db-instance-class=db.t3.micro \
    --engine=mysql \
    --master-username=admin \
    --master-user-password="thepasswordIchose" \
    --vpc-security-group-ids="sg-0bf6fa7080100e55b" \
    --backup-retention-period=0 \
    --port=3307 \
    --no-multi-az \
    --engine-version=8.0.25 \
    --publicly-accessible

It takes several minutes for my Database Instance to be created, then I can log into it with the command:

mysql -h encryption-tester.accountidstuff.us-east-1.rds.amazonaws.com -u admin --port=3307 -p

I run the command show status like 'ssl_cipher'; and look at that! My connection is encrypted already, as indicated by Cipher method present:

$ mysql -h encryption-tester.accountidstuff.us-east-1.rds.amazonaws.com -u admin --port=3307 -p
Enter password:
Welcome to the MySQL monitor.  Commands end with ; or \g.
Your MySQL connection id is 17
Server version: 8.0.25 Source distribution

Copyright (c) 2000, 2021, Oracle and/or its affiliates.

Oracle is a registered trademark of Oracle Corporation and/or its
affiliates. Other names may be trademarks of their respective
owners.

Type 'help;' or '\h' for help. Type '\c' to clear the current input statement.

mysql> show status like 'ssl_cipher';
+---------------+-----------------------------+
| Variable_name | Value                       |
+---------------+-----------------------------+
| Ssl_cipher    | ECDHE-RSA-AES128-GCM-SHA256 |
+---------------+-----------------------------+
1 row in set (0.01 sec)

I haven’t set up any client certificates or anything special, yet my connection is encrypted. But let’s not take the session variable’s word for it. Lets double-check by capturing and inspecting some packets.

I’ll run tcpdump with this command:

sudo tcpdump -i any host encryption-tester.accountidstuff.us-east-1.rds.amazonaws.com  -s 65535 -w /tmp/initial-connection.pcap

To make it quick, Instead of using a full packet-analysis program, I just run the strings command to look for text strings in the packet capture:

17:05 $ strings -8  /tmp/initial-connection.pcap
=JpgP~eS
mysql_native_password
Washington1
Seattle1"0
Amazon Web Services, Inc.1
Amazon RDS1%0#
Amazon RDS us-east-1 2019 CA0
210824170035Z
240822170850Z0
:encryption-tester.accountidstuff.us-east-1.rds.amazonaws.com1
Amazon.com1
Seattle1
Washington1
Seattle1
Washington1"0
Amazon Web Services, Inc.1
Amazon RDS1 0
Amazon RDS Root 2019 CA
:encryption-tester.accountidstuff.us-east-1.rds.amazonaws.com0
Seattle1
Washington1"0
Amazon Web Services, Inc.1
Amazon RDS1 0
Amazon RDS Root 2019 CA0
190919181653Z
240822170850Z0
Washington1
Seattle1"0
Amazon Web Services, Inc.1
Amazon RDS1%0#
Amazon RDS us-east-1 2019 CA0
HId0%aC>

Looks like a lot of stuff in that output about the certificate and SSL negotiation, but nothing containing the queries I executed.

I’m going to try it again and specifically disable encryption to see what the packets look like and ensure they contain the plain-text statements and responses I expect:

This is my SQL session:

17:05 $ mysql --ssl-mode=DISABLED -h encryption-tester.accountidstuff.us-east-1.rds.amazonaws.com -u admin --port=3307 -p
Enter password:
Welcome to the MySQL monitor.  Commands end with ; or \g.
Your MySQL connection id is 32
Server version: 8.0.25 Source distribution

Copyright (c) 2000, 2021, Oracle and/or its affiliates.

Oracle is a registered trademark of Oracle Corporation and/or its
affiliates. Other names may be trademarks of their respective
owners.

Type 'help;' or '\h' for help. Type '\c' to clear the current input statement.

mysql> select version();
+-----------+
| version() |
+-----------+
| 8.0.25    |
+-----------+
1 row in set (0.00 sec)

mysql> show status like 'ssl_cipher';
+---------------+-------+
| Variable_name | Value |
+---------------+-------+
| Ssl_cipher    |       |
+---------------+-------+
1 row in set (0.01 sec)

mysql> \q

The strings in the packets captured during that session clearly contain things relevant to the commands that I executed:

17:05 $ strings -5 /tmp/skip-ssl.pcap
1%aCu
1%a\u
8.0.25
*Bi|tm
UkU-dsK
mysql_native_password
admin
mysql_native_password
Linux
_client_name
libmysql
24817
_client_version
5.7.35  _platform
x86_64
program_name
mysql
select @@version_comment limit 1
@@version_comment
Source distribution
select version()
        version()
8.0.25
show status like 'ssl_cipher'
performance_schema
session_status
session_status
Variable_name
Variable_name
performance_schema
session_status
session_status
Value
Value
Ssl_cipher

Conclusion:

SSL Client-Certificates are NOT required for traffic to be encrypted to a MySQL server. In fact, with a modern client and server, SSL is preferred and is automatically enabled. Just like I’d expect for traffic to be encrypted by default in 2021.

So what is the purpose of Client Certificates during a MySQL Connection

Client Certificates are intended to verify the identity of the Client. They are an extra step of authentication beyond a typical username and password. By presenting a client certificate that has been properly signed by a recognized Certificate Authority, the client is proving that their identity or system has been verified by the Certificate Authority.

Because SSL is complicated and is not well understood, many well-meaning people have instructions for creating a client key and client certificate, and transmitting those to authorized users. While that does provide a second piece of information needed to authenticate to the server, it is not how a secure client should authenticate.

The proper, fully secure method for a client to get a certificate is for the client to create its own private key. It should never share that key, even with the Certificate Authority. With the private key created, it would then create a certificate signing request (CSR), and present only the certificate signing request to the Certificate Authority. The certificate authority takes whatever steps it requires to verify the authenticity of the client, then provide the client back with a Client Certificate signed by the Certificate Authority. That Client Certificate is the client’s evidence that it’s identity has been verified by the Certificate Authority. The Certificate Authority is able to provide the client certificate without ever having the client’s private key.

Best Practices

If you run a MySQL Server and want to require that all clients to connect via SSL/TLS, you can set the global setting require_secure_transport to true. To require SSL only for specific users, use the CREATE USER ... REQUIRE SSL statement when creating the MySQL user

MySQL Statistics for Updates/Inserts per-table

For a long time, I’ve never been able to answer some basic questions that I thought fundamental to optimizing server performance. MySQL gives you some server-wide metrics about activity, but none of it is broken down per-table so that an application developer could look into where to reduce the number of writes, or generally where to focus their attention in order to improve the server performance.

I finally got ambitious enough to tackle this problem and asked a question on StackOverflow at https://stackoverflow.com/questions/39459185/mysql-how-to-count-the-number-of-inserts-updates-to-a-table

A commenter named barat pointed me to this post which had the insightful idea of parsing the binary log for analysis.
Since my servers are generally hosted on AWS, I don’t have direct access to the binary log, so I had to retrieve those. The MySQL documentation for the mysqlbinlog command briefly mentions how to read the binary log from a remote server. It took some experimentation to get the right command and output options with all of the data I wanted. Specifically, the `–base64-output=DECODE-ROWS –verbose` options which translate some of the row-based logging into MySQL commands that can be parsed.

The first step is to create a user that has access to the binary logs. I used the main ‘admin’ user that RDS creates because it was convenient. If creating a new user, you probably need to grant the REPLICATION_SLAVE privilege.

You can see which binary logs are available on the server with the SHOW BINARY LOGS; command:

mysql> show binary logs;
+----------------------------+-----------+
| Log_name                   | File_size |
+----------------------------+-----------+
| mysql-bin-changelog.232522 | 16943219  |
| mysql-bin-changelog.232523 | 32300889  |
| mysql-bin-changelog.232524 | 15470603  |
+----------------------------+-----------+

Then you can actually retrieve the log and print to STDOUT using this command:

14:01 $ mysqlbinlog --read-from-remote-server \
  --host myhost.somerandomchars.us-east-1.rds.amazonaws.com \
  --user admin \
  --password="mypassword"
  mysql-bin-changelog.232522

Note that if you get the error below, you need to make sure that your MySQL client and server tools are using the same version. I originally attempted to use MySQL 5.5 tools with a MySQL 5.6 server.

ERROR: Got error reading packet from server: Slave can not handle replication events with
the checksum that master is configured to log; the first event 'mysql-bin-changelog.232519'
at 4, the last event read from '/rdsdbdata/log/binlog/mysql-bin-changelog.232519' at 120,
the last byte read from '/rdsdbdata/log/binlog/mysql-bin-changelog.232519' at 120.

After that, it was just a matter of parsing the file for the relevant commands. I’ve put all of that logic now into a quick PHP script that I can reuse anywhere. Now, I can go through a bunch of binary logs on a server and see which tables are updated the most frequently with output like this:

Parsed 1,096,063 lines spanning 300 seconds between 2016-09-13 03:05:00 and 2016-09-13 03:10:00
master                         metrics                        update          = 43570
master                         metrics                        insert into     = 9
DEFAULT                        accounts                       update          = 501
DEFAULT                        users                          update          = 5
DEFAULT                        logins                         insert into     = 1
mysql                          rds_heartbeat2                 insert into     = 1

I’ve committed this project to Github at https://github.com/sellerlabs/mysql-writes-per-table for others to use.

MySQL Error: Client requested master to start replication from impossible position

I’ve had this error occur when something went terribly wrong on a master server and it had to be rebooted. It appears that the master’s binary log file was not completely written to the server before it was rebooted. However part of the master log file was transmitted to the slave before that time. The error is coming from the slave server when it tried to reconnect to the master. It is trying to connect to the master server and start copying the binary log file from a position which the master does not have.

The proper way to fix this error is to completely resync the data from the master and begin replication over again. However, in many cases, that is impractical, or not worth the hassle, so I was able to fix the problem by setting the slave back to a valid position on the master and then skipping forward over the missing entries.

First, you need to find out what the last valid position is on the master. Run ‘SHOW SLAVE STATUS’ on the slave to figure out which master log file it was reading when the master crashed. You’ll need the value of the Relay_Master_Log_File parameter. Also take note of the Exec_Master_Log_Pos value.

Next, go to the master, and ensure that log file exists in the MySQL data directory. The file size will probably be less than the Exec_Master_Log_Pos value that the slave had stored. To find the last valid position in the log file use the mysqlbinlog utility. The command

mysqlbinlog [LOGFILE] |tail -n 100

should show the final entries in the binary log. Find the last line in the file that looks similar to this:

#120512 13:30:44 server id 3  end_log_pos 8796393       Query   thread_id=138884124     exec_time=0     error_code=0

The number after end_log_pos is the last valid entry that the master has available. The difference between the master log position that the slave had, and this highest one on the master will give you some idea how far ahead the slave got before the master crashed.

You can now go back to the slave and issue the commands:

STOP SLAVE;
CHANGE MASTER TO MASTER_LOG_POS=8796393;
START SLAVE;

This will tell the slave to try to start from that valid position, and continue from there.

There is a strong possibility that you’ll run into some duplicate key errors if the slave was very far ahead of where the master’s log ended. In that case, you can issue this command to bypass those one at a time (or more if you want to skip more than one)

STOP SLAVE;
SET GLOBAL SQL_SLAVE_SKIP_COUNTER = 1;
START SLAVE;

!! Note that if you have to do this, then your data between the master and slave is almost certainly inconsistent !! Be sure to understand your data to make sure that this is something you can live with.

Southeast Linux Fest Presentation on MySQL Replication

I was fortunate to be selected to give a presentation at the 2010 Southeast Linux Fest held this year in Greenville, SC. The topic was MySQL replication which I picked from a similar presentation I gave about about 1.5 years ago at my local LUG. I’ve configured plenty of replicated servers and I think that I understand it well enough to explain it to others.

The 2-hour presentation is about half slides and half demo. Throughout the course of the presentation I set up a simple master-slave. Then I add a second slave. Taking it a step farther I set up the three servers to replicate in a chain, and finally I configure them to replicate in a full circle so that changes made on one are propagated to all of the others. I intentionally do things that break replication at certain points to show some of the limitations and configurable features that can help it to work.

Slides for the presentation are available OpenOffice format.

The presentation was recorded, so hopefully the SELF team will have those videos available shortly.

Skipping the DROP TABLE, CREATE TABLE statements in a large mysqldump file.

I have a large table of test data that I’m copying into some development environments. I exported the table with a mysqldump which has a DROP TABLE and CREATE TABLE statements at the top

DROP TABLE IF EXISTS `mytable`;
CREATE TABLE `mytable` (
  `somecol` varchar(10) NOT NULL default '',
   ... other columns ...
  PRIMARY KEY  (`somecol`),
  KEY `isbn10` (`somecol`)
) ENGINE=InnoDB DEFAULT CHARSET=latin1;

The problem is that the developer has altered the table and re-importing the test data would undo those changes. Editing the text file is impractical because of its size (500 MB gzipped). So I came up with this workaround which just slightly alters the SQL using sed so that it doesn’t try to drop or recreate the table. It comments out the DROP TABLE line, and creates the new table in the test database instead of the real database.

zcat bigfile.sql.gz |sed "s/DROP/-- DROP/"|sed "s/CREATE TABLE /CREATE TABLE test./"|mysql databasename

PHP Wrapper Class for a Read-only database

This is a pretty special case of a database wrapper class where I wanted to discard any updates to the database, but want SELECT queries to run against an alternative read-only database. In this instance, I have a planned outage of a primary database server, but would like the public-facing websites and web services to remain as accessible as possible.

I wrote this quick database wrapper class that will pass all SELECT queries on to a local replica of the database, and silently discard any updates. On this site almost all of the functionality still works, but it obviously isn’t saving and new information while the primary database is unavailable.

Here is my class. This is intended as a wrapper to an ADOdb class, but it is generic enough that I think it would work for many other database abstraction functions as well as seamless data pump.

class db_unavailable {
    var $readonly_db;

    function __construct($readonly_db)
    {
        $this->query_db = $readonly_db;
    }

    function query($sql)
    {
        $args = func_get_args();
        if (preg_match("#(INSERT INTO|REPLACE INTO|UPDATE|DELETE)#i", $args[0])) {
            // echo "Unable to do insert/replace/update/delete query: $sql\n";
            return true;
        } else {
            return call_user_func_array(array($this->readonly_db, 'query'), $args);
        }
    }

    function __call($function, $args)
    {
        return call_user_func_array(array($this->readonly_db, $function), $args);
    }
}

I simply create my $query_db object that points to the read-only database. Then create my main $db object as a new db_unavailable() object. Any select queries against $db will behave as they normally do, and data-modifying queries will be silently discarded.

« Older posts

© 2025 Brandon Checketts

Theme by Anders NorenUp ↑