After we heard that the Star Wars Galactic Star Cruiser was shutting down, my wife and I decided to make a second trip to enjoy it while we still could. Our first visit was shortly after it opened with our six teenage kids. This time it was just adults, so we got to “play” ourselves a little more than when kids were there.
The Star Cruiser is a very unique experience that has been tough for others to describe – which is probably why they haven’t been able to stay busy enough to keep it going. It’s a mix of hotel, restaurant, cruise ship, theater, improv, theme park, escape room and video game, all in the setting of a Galaxy Far, Far awayI
For the ~86,000 people that were able to experience it, there was an impressive amount of innovation on display and to experience. Below are the things that I thought of, but please comment below if you can think of any that I missed or would like to clarify.
These are not in any particular order, except I tried to put some that I was most impressed with toward the end.
#1 – Custom music, songs for Gaya
The galactic superstar, Gaya, has a pretty important role throughout the voyage, often simply to distract the First Order from the smuggling going on under their noses. Gaya has had custom songs written for her that I didn’t think were particularly great, but she belts them out with confidence as part of the story.
#2 – Custom Lighting and scents
By no means is this the first instance of Disney using custom lighting or smells, but it these elements are present from the moment you board the Halcyon, and throughout most of the “storytelling” parts of the experience.
#3 – Real emergency versus “in show” emergency
While “boarding” the ship, shortly after going through Security and before traveling “up” to the ship, there is a short orientation video that differentiates between a “Show” alarm and an actual emergency. The In-Show alarm has strobing red lights and a droid voice stating to meet in the lobby. The actual emergency includes bright white lights and a human voice clearly stating that “this is a real emergency” and “this is not part of the show”.
#4 – Emergency exits from windowless rooms
The most under-utilized innovation which likely required a significant amount of design, construction, and testing is the emergency evacuation procedures from the windowless cabins. Each stateroom has a small emergency exit window that is visible on the building exterior. Within the cabin, this opens a narrow passage that presumably further opens to the exterior. A phone and labels in the space are meant to connect guests to emergency staff that can assist in an evacuation.
The Reedy Creek Fire Department was trained on how to assist guests in evacuating from these rooms and could do so quickly in an emergency.
#5 – Entire Bridge Experience
The bridge training experience, and subsequent story element where you commandeer the bridge is a pretty fun experience and one of the highlights for myself. There are four stations (Systems, Weapons, Cargo, and Shields). You get a chance at each of the four stations, where each one is taught in one to two minutes. Then you get a 1-2 minute practice round, and a 2-3 minute “real” round to count your score.
The controls are pretty simplistic and kind of “1990s” in design complexity. But they are pretty effective for the short time frame in which you can learn and then use them.
#6 – Puzzles in the engineering room, access to doors, etc.
Similar to the Bridge Experience, the Engineering room has probably 8 different “puzzles” that you can solve with physical props like levers, buttons, and switches. These can be fun to solve on their own, but they are also involved in several parts of the story. Depending on which storyline you are following, the First Order commander may meet you in the Engineering Room to “Take Over” the ship by everyone in the group solving the various puzzles simultaneously. Or the Captain may take you to the Engineering room to also do the same puzzles and “take back” the ship.
#7 – Room droid’s voice recognition
Each cabin has a console where you can check in with the guest experience droid, who has an ongoing story of her own that ties in with the overall story on the ship. Guests can speak to the droid, which uses some now-commonplace speech recognition to understand what you are saying and respond mostly appropriately.
#8 – Custom schedule for each group
This is another not super-impressive innovation, because it is just scheduling, but I can’t think of another place in Disney Parks/Resorts or other places that schedules guests for smaller group events. Sometime after checking in, you get events in your schedule (inside the Data Pad app) that assign you a custom time for Lightsaber Training, Bridge Training, and a departure time for the Batuu shuttle. The first two of these are specifically for you, and if you miss them, it may not be possible to make them up. The shuttle to Batuu is more flexible as it runs every ~5 minutes and you can come and go as you please after the majority of guests have exited.
#9 – All exterior Screens when ship goes to hyperspace
A nice integration that takes place on a wide scale is that every “exterior” window of the ship that looks out into space are all synchronized so that they all work together and display the status of the ship in the story. When one of the bridge training crews jumps to Hyperspace, every window in every cabin, and throughout the ship also goes into Hyperspace. When you arrive in an asteroid field, all of the “windows” show asteroids appropriately.
#10 – Audio that follows characters on the upper stage area
One of the “stages” on which the actors play out their story is in the balcony above the atrium. From their elevated position, they argue with each other and eventually fight. The characters often wander back and forth along the balcony and their amplified voices follow them impressively well by using disguised speakers on the railings. The speakers also have a few special effects in the closing battle.
#11 – Secret merchandise compartments
This low-tech innovation is kind of a fun part of the story. If you talk with the merchandise cast members when the store is empty and subtly mention that you are part of the Resistance and tell them a certain phrase, they will use a magnet to unlock one of several secret compartments in the store that contains merchandise for those willing to help the resistance cause.
#12 – Constantly Progressing, Real-Time Story
After two visits, I still don’t know that I’ve completely followed the story, even with the character that I was following pretty closely. In every other theme park or interactive experience I can think of, the guest fully experiences the entire experience as it was intended. During the Galactic Starcruiser experience, it is literally impossible to catch every aspect of what is happening. Since the story progresses in real-time, things are happening which you have to learn about by other guests telling you about, or by context afterwards.
On my first visit, I was a little put-off by this and having “missed out” on important things, but I was fascinated by it this time knowing that you aren’t supposed to see everything yourself. It is much more “real” feeling as in the way we’d experience things outside of the fabricated “rides” and “lands” that we’re used to.
#13 – Lightsaber Training
The lightsaber training has been called elementary by some, and is an important part of the experience to others. I only got to experience it on one of my two trips because they were very strict about the start time and not letting anybody enter once it had begun.
#14 – Rey’s lightsaber
Much has been written about Rey’s “real” lightsaber, which is seen for a few seconds while it extends before she (often clumsily) swaps it out for one that can be used in the fight. They even went so far as to file a patent for this innovation
#15 – Custom Sabacc gameplay/rules
A custom version of the game Sabaac was created called “Coruscant Shift”. This version is easy to learn, and, probably more importantly, had rules that didn’t require anything too fancy for the custom Sabacc Holoboard to implement.
#16 – Sabacc holoboard
In the center of the Sublight Lounge is a large, custom Sabacc table game that displays the cards to each player using holograms. There’s nothing like it and the Imagineers had to create it with custom electronics and screens that showed the holograms. Again, the gameplay is pretty primitive and simple, but this was probably a fairly significant project to bring together.
#17 – ‘Nearness’ to the characters gains you ‘familiarity’
In the Data Pad app, under your profile, it displays a “nearness” and “trust” of the main characters. As far as I can tell, the “nearness” to a character has to do with time that you have actually spent in physical proximity to the character. I’m unsure exactly how they accomplish this. Most likely it is some kind of NFC tracking built into the Magic Band, or Bluetooth scanner in the App. There are also times, I found, where the character asks for and repeats your name, so perhaps there is an audio prompt as well (or perhaps it is just the actor genuinely trying to remember your name).
Being “near” to a character seems to unlock certain story arcs and messages you have with them in the app. Note that according to this interesting video, being near to a character in public places may gain you familiarity with the character, but you have to take actions in favor of the character to gain reputation.
#18 – Transport to Batuu
The box truck that is decked out as a space transport ship does a great job of keeping you “in-world” for the ~5 minute ride between the Galactic Starcruiser building and the in-park entrance to Batuu. If you think about it, you can tell that you’re riding in the cargo section of a box truck, but if you don’t think about it too much, the interior of the vehicle and the music do a good job of continuing the story.
#19 – Integration between app, characters, terminals, experiences on Batuu, Droid in the room
As a systems engineer and business owner, I have some glimpses at all of the various systems, both technical and people-related that have gone into putting this entire experience together. One of the most impressive aspects to me is that it all “works” and relatively transparently to the guest. This involves multiple departments and mostly unrelated backend systems talking together.
The simplest of examples is that your excursion into Batuu includes meals, which integrates with Disney Dining Plans to make them included.
As a more complexe example, consider that boarding the shuttle to Batuu unlocks messages in the datapad app opon your arrival in the park. They also scan you into the park (similar to going through the front entrance), and they enable Lightning Lanes in yet another Disney system so that you can experience the two attractions without waiting in the full line. These are many separate backend systems that are integrated together fairly seamlessly to the guest.
#20 – Storytelling with improv
Improv certainly isn’t new. And acting certainly isn’t new. But it seems to be a pretty new skill to move a story forward while interacting with guests in the context of a different universe. I was surpsised by the depth of knowledge from the actors about obscure characters and designs. For example, my brother-in-law wearing a logo of some kind, and a couple of characters on the “antique” design as it was from the timeline of the original movies, but the StarCruiser is set during the last trilogy.
The actors also did a fantastic job of being accessible and including everybody that wanted to participate in their story. On each of my trips, there were a couple of guests that stood out in being on their side” and the actors would include in the story and narrative.
#21 – Letter from Croy after he’s arrested
And finally, after the story concludes, the actors stay around for a bit and the guests tend to tell them “thank you” and kindof wind up that relationship. The actors, of course do a great job of staying in character while being gracious. However Lt Croy is arrested as part of the final event, so he’s not around to talk with. That was a bit of a disappointment as we spent most of our time with him and the First Order on our second trip.
In one of my favorite little details, when we arrived back at the cabin at the end of the night, there was a letter from Lt Croy explaining that he’s devising a way to get back to his station, and thanking us for efforts in assisting the First Order!
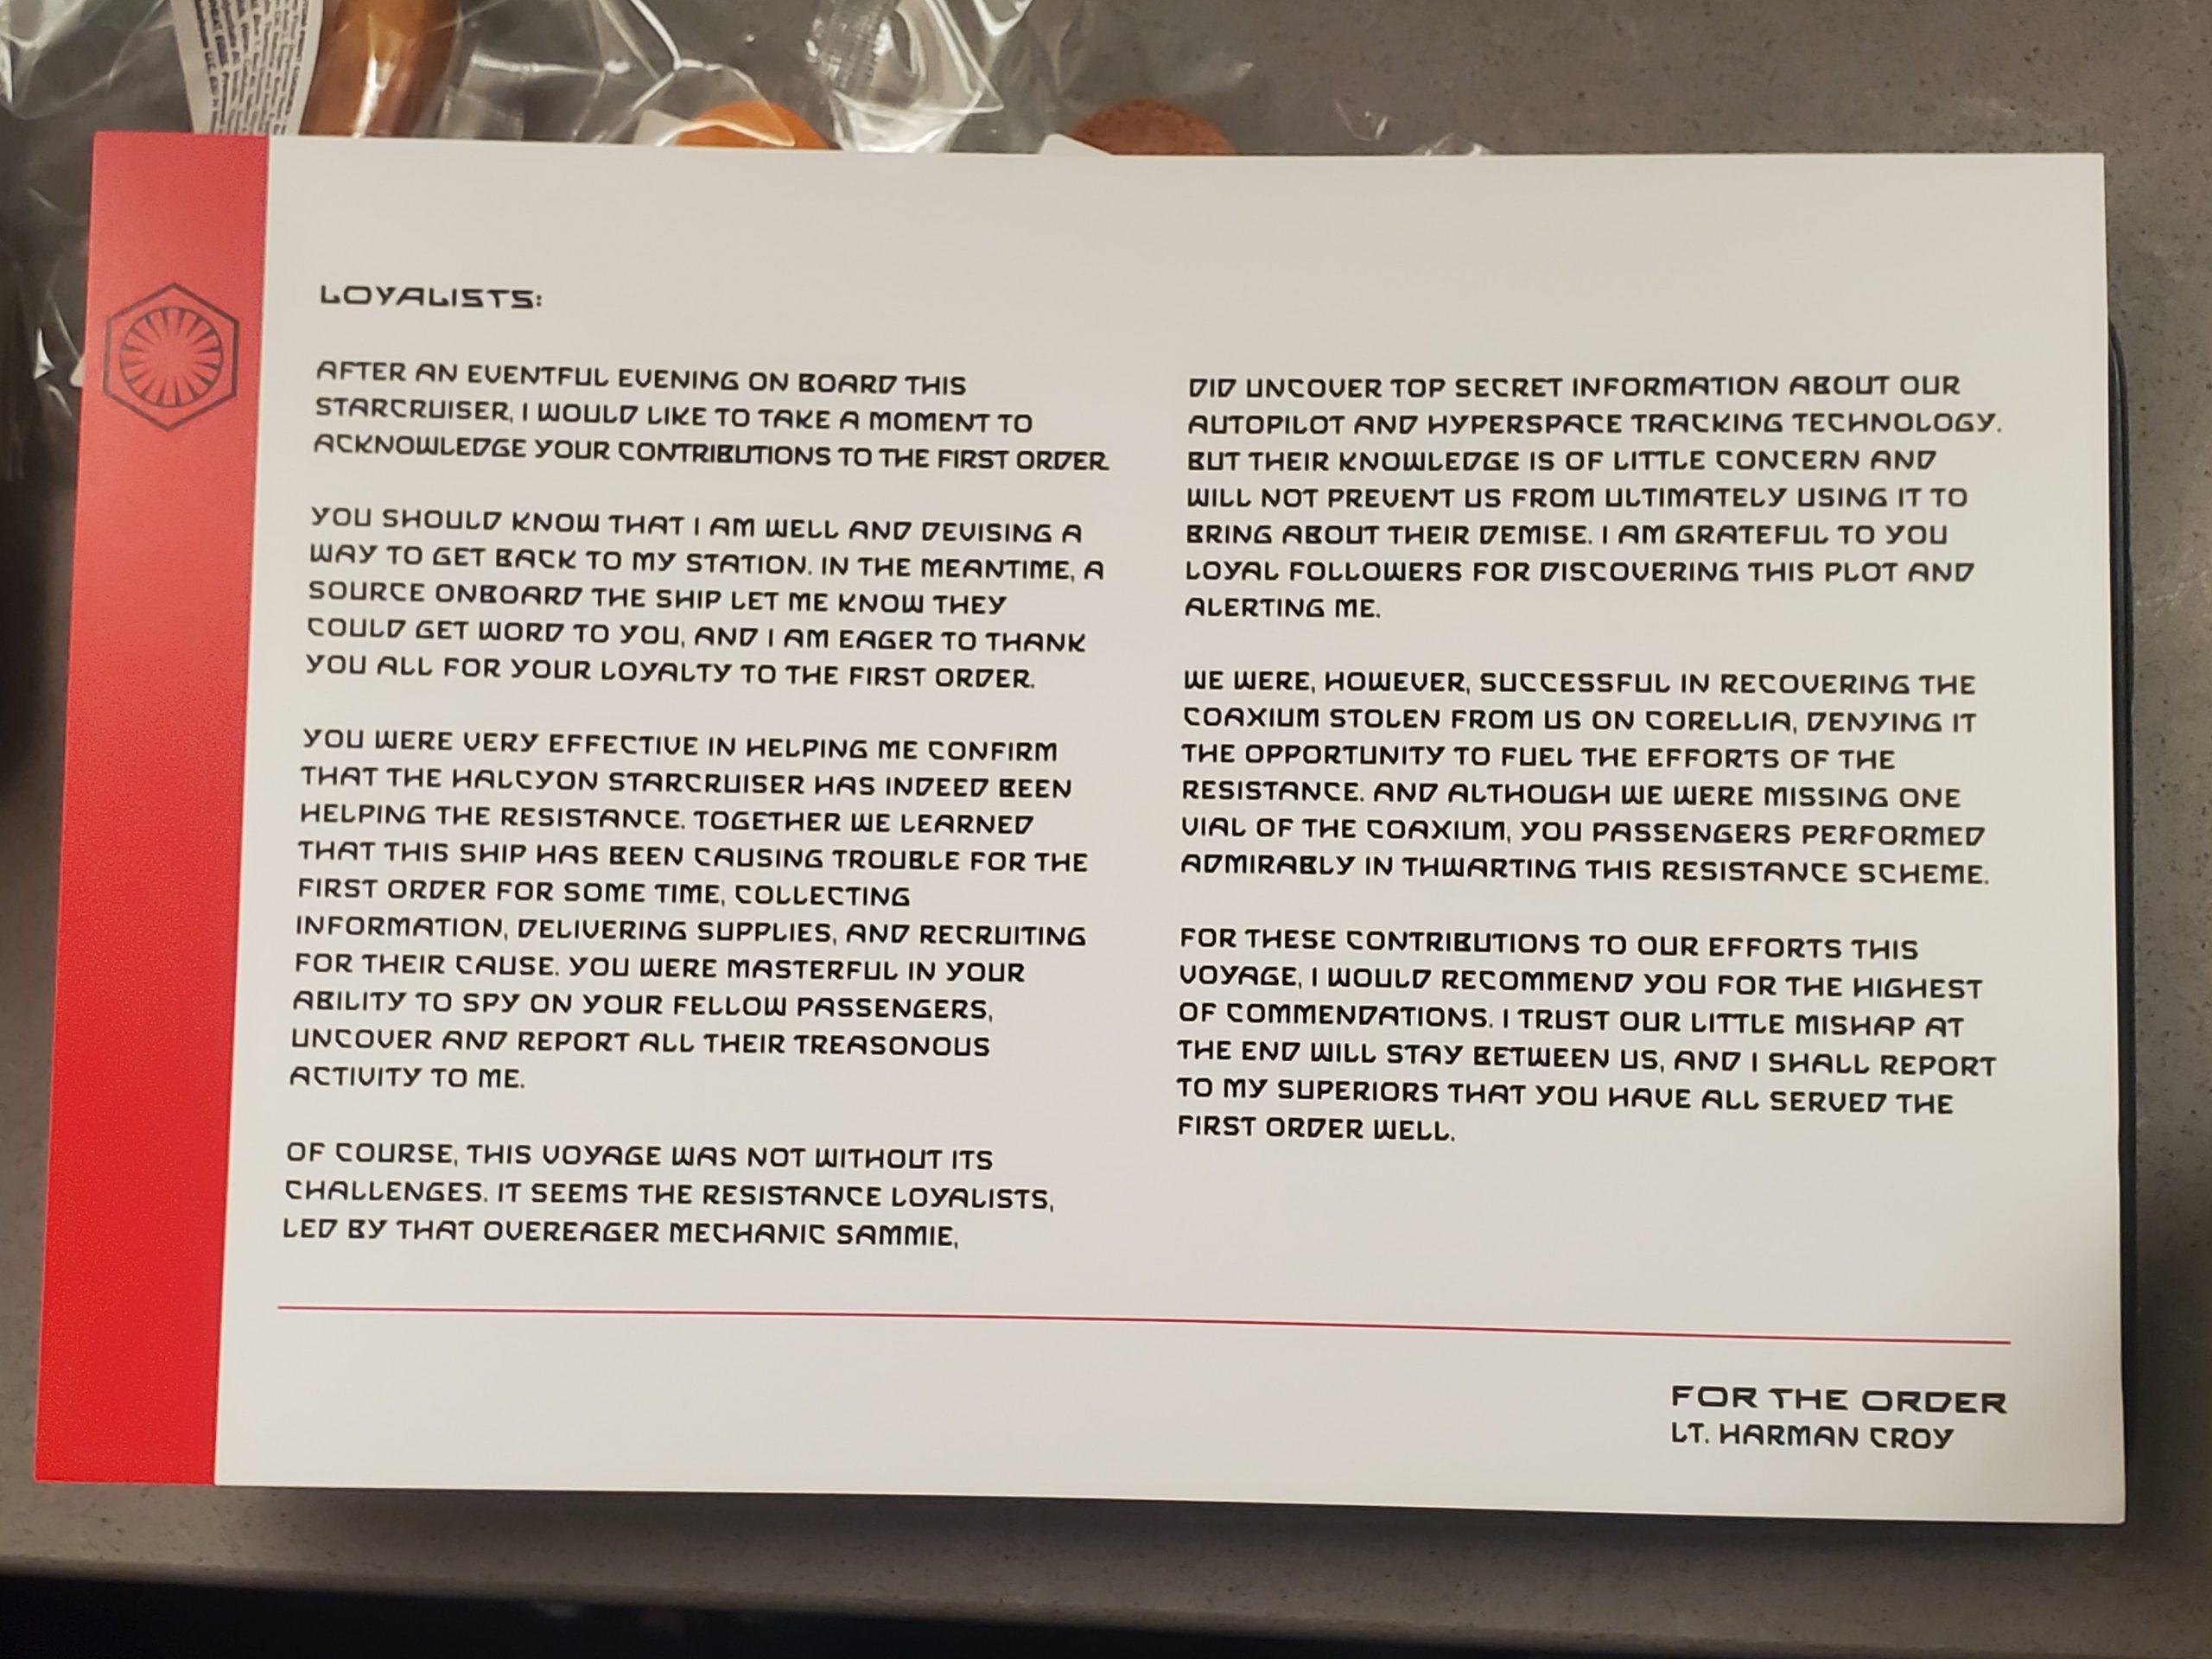
Letter from Lt Croy
What else did you notice that I missed? I’m sure there is plenty more. Let me know in the comments below!